Showing posts with label unix. Show all posts

Friday, December 19, 2014

Basic Hadoop Operations


Create a directory in hadoop:


  • hadoop fs -mkdir hdfs://localhost:9000/user/hadoop/mytestdir2
  • hadoop fs -mkdir /user/hadoop/mytestdir3


LISTING:


  • hadoop fs -ls  hdfs://localhost:9000/user/hadoop/
  • hadoop fs -ls /user/hadoop/


Create a local file and upload to hadoop directory: touch helloworld.txt or nano helloworld.txt

  • hadoop fs -put helloworld.txt /shiraz/hadoop/ 
  •  hadoop fs -cat /shiraz/hadoop/helloworld.txt


compiling:
  •  hadoop com.sun.tools.javac.Main WordCount.java
you may need to export the HADOOP_CLASSPATH variable:
export HADOOP_CLASSPATH= /usr/lib/jvm/java-7-openjdk-amd64/lib/tools.jar


running a hadoop job:
  • hadoop jar wc.jar WordCount /shiraz/hadoop/input /shiraz/hadoop/output/paracount

hadoop executable location:
  • /usr/local/hadoop/bin/hadoop

conf/*-site.xml
  • /usr/local/hadoop/etc
mapred-site.xml
yarn-site.xml
core-site.xml
hdfs-site.xml

hdfs location:
  • /usr/local/hadoop_store/hdfs

start-all.sh, start-dfs.sh,  start-yarn.sh
  • /usr/local/hadoop/sbin

Thursday, December 18, 2014

Install Hadoop on Ubuntu


Set Date Time in Ubuntu

sudo date new_date_time_string

where new_date_time_string has to follow the format MMDDhhmmyyyy.ss which is described below:

MM is a two digit month, between 01 to 12
DD is a two digit day, between 01 and 31, with the regular rules for days according to month and year applying
hh is two digit hour, using the 24-hour period so it is between 00 and 23
mm is two digit minute, between 00 and 59
yyyy is the year; it can be two digit or four digit
ss is two digit seconds. Notice the period . before the ss.

So, in your particular case, you can use:

sudo date 010224311971.59

Enable Root Login For ssh - Ubuntu 14.04

Add/comment Following Lines as shown below in /etc/ssh/sshd_config:


#PermitRootLogin without-password
PermitRootLogin yes
#StrictModes yes

# Change to no to disable tunnelled clear text passwords
PasswordAuthentication yes

UsePAM no

Restart ssh service:
sudo service ssh restart

If ssh is not installed, do it as below: 
sudo apt-get install openssh-server

SSH is not enabled by default in Ubuntu, but you can easily enable this service via OpenSSH, a free version of the SSH connectivity tools developed by the OpenBSD Project.

Another method to restart ssh:
sudo /etc/init.d/ssh restart

What is the difference between ssh_config and sshd_config?

ssh_config: 
Configuration file for the ssh client on the host machine you are running. For example, if you want to ssh to another remote host machine, you use a SSH client. Every settings for this SSH client will be using ssh_config, such as port number, protocol version and encryption/MAC algorithms.

sshd_config: 
Configuration file for the sshd daemon (the program that listens to any incoming connection request to the ssh port) on the host machine. That is to say, if someone wants to connect to your host machine via SSH, their SSH client settings must match your sshd_config settings in order to communicate with you, such as port number, version and so on.

The sshd_config is the ssh daemon (or ssh server process) configuration file. 
Whereas, the ssh_config file is the ssh client configuration file. The client configuration file only has bearing on when you use the ssh command to connect to another ssh host. 

example:

For the SSH port number, ssh_config is manually set to be 1000 (decided by the remote host), sshd_config is set to be 5555. If anyone wants to connect to your host, they MUST set their ssh client port always to 1000. However, you will always use port 5555 as the default port (instead of the 22) to connect to a remote machine. If the remote machine uses another port or the standard port, you need to specify the port number in the command line, e.g., “ssh -p 22 remote.host.ip”


Wednesday, December 17, 2014

Change password for a user in Linux

It is a very simple command (requires su or root access):

passwd <username>

List all users in Linux

cat /etc/passwd
First column tells you the username

Centos / RHEL /  Fedora / Debian / Ubuntu List Users Command
Fig.01: List users using /etc/passwd

use awk command to filter out only the usernames:

 awk -F':' '{ print $1}' /etc/passwd

Following shell script will list all the normal users and system accounts:


#!/bin/bash
# Name: listusers.bash
# Purpose: List all normal user and system accounts in the system. Tested on RHEL / Debian Linux
# Author: Vivek Gite <www.cyberciti.biz>, under GPL v2.0+
# -----------------------------------------------------------------------------------
_l="/etc/login.defs"
_p="/etc/passwd"
 
## get mini UID limit ##
l=$(grep "^UID_MIN" $_l)
 
## get max UID limit ##
l1=$(grep "^UID_MAX" $_l)
 
## use awk to print if UID >= $MIN and UID <= $MAX and shell is not /sbin/nologin   ##
echo "----------[ Normal User Accounts ]---------------"
awk -F':' -v "min=${l##UID_MIN}" -v "max=${l1##UID_MAX}" '{ if ( $3 >= min && $3 <= max  && $7 != "/sbin/nologin" ) print $0 }' "$_p"


echo ""
echo "----------[ System User Accounts ]---------------"
awk -F':' -v "min=${l##UID_MIN}" -v "max=${l1##UID_MAX}" '{ if ( !($3 >= min && $3 <= max  && $7 != "/sbin/nologin")) print $0 }' "$_p"
 
----------[ Normal User Accounts ]---------------
vivek:x:500:500::/home/vivek:/bin/bash
raj:x:501:501::/home/raj:/bin/ksh
ash:x:502:502::/home/ash:/bin/zsh
jadmin:x:503:503::/home/jadmin:/bin/sh
wwwint:x:506:506::/htdocs/intranet:/bin/bash
scpftp:x:507:507::/htdocs/ftpjail:/bin/bash
rsynftp:x:508:508::/htdocs/projets:/bin/bash
mirror:x:509:509::/htdocs:/bin/bash
jony:x:510:510::/home/jony:/bin/ksh
amyk:x:511:511::/home/amyk:/bin/ksh
----------[ System User Accounts ]---------------
root:x:0:0:root:/root:/bin/bash
bin:x:1:1:bin:/bin:/sbin/nologin
daemon:x:2:2:daemon:/sbin:/sbin/nologin
adm:x:3:4:adm:/var/adm:/sbin/nologin
lp:x:4:7:lp:/var/spool/lpd:/sbin/nologin
sync:x:5:0:sync:/sbin:/bin/sync
shutdown:x:6:0:shutdown:/sbin:/sbin/shutdown
halt:x:7:0:halt:/sbin:/sbin/halt
mail:x:8:12:mail:/var/spool/mail:/sbin/nologin
uucp:x:10:14:uucp:/var/spool/uucp:/sbin/nologin
operator:x:11:0:operator:/root:/sbin/nologin
games:x:12:100:games:/usr/games:/sbin/nologin
gopher:x:13:30:gopher:/var/gopher:/sbin/nologin
ftp:x:14:50:FTP User:/var/ftp:/sbin/nologin
nobody:x:99:99:Nobody:/:/sbin/nologin
dbus:x:81:81:System message bus:/:/sbin/nologin
vcsa:x:69:69:virtual console memory owner:/dev:/sbin/nologin
abrt:x:173:173::/etc/abrt:/sbin/nologin
haldaemon:x:68:68:HAL daemon:/:/sbin/nologin
ntp:x:38:38::/etc/ntp:/sbin/nologin
saslauth:x:499:499:"Saslauthd user":/var/empty/saslauth:/sbin/nologin
postfix:x:89:89::/var/spool/postfix:/sbin/nologin
apache:x:48:48:Apache:/var/www:/sbin/nologin
webalizer:x:67:67:Webalizer:/var/www/usage:/sbin/nologin
sshd:x:74:74:Privilege-separated SSH:/var/empty/sshd:/sbin/nologin
tcpdump:x:72:72::/:/sbin/nologin
mysql:x:27:27:MySQL Server:/var/lib/mysql:/bin/bash
memcached:x:498:496:Memcached daemon:/var/run/memcached:/sbin/nologin
squid:x:23:23::/var/spool/squid:/sbin/nologin
rpc:x:32:32:Rpcbind Daemon:/var/cache/rpcbind:/sbin/nologin
rpcuser:x:29:29:RPC Service User:/var/lib/nfs:/sbin/nologin
nfsnobody:x:65534:65534:Anonymous NFS User:/var/lib/nfs:/sbin/nologin
courtesy: http://www.cyberciti.biz/faq/linux-list-users-command/

nslookup, host, dig commands

nslookup www.google.com
Server:         10.40.4.247
Address:        10.40.4.247#53

Non-authoritative answer:
Name:   www.google.com
Address: 74.125.236.50
Name:   www.google.com
Address: 74.125.236.52
Name:   www.google.com
Address: 74.125.236.51
Name:   www.google.com
Address: 74.125.236.48
Name:   www.google.com
Address: 74.125.236.49


host www.google.com
www.google.com has address 74.125.236.50
www.google.com has address 74.125.236.49
www.google.com has address 74.125.236.52
www.google.com has address 74.125.236.48
www.google.com has address 74.125.236.51


dig www.google.com

; <<>> DiG 9.8.2rc1-RedHat-9.8.2-0.30.rc1.el6 <<>> www.google.com
;; global options: +cmd
;; Got answer:
;; ->>HEADER<<- opcode: QUERY, status: NOERROR, id: 34580
;; flags: qr rd ra; QUERY: 1, ANSWER: 5, AUTHORITY: 0, ADDITIONAL: 0

;; QUESTION SECTION:
;www.google.com.                        IN      A

;; ANSWER SECTION:
www.google.com.         286     IN      A       74.125.236.49
www.google.com.         286     IN      A       74.125.236.52
www.google.com.         286     IN      A       74.125.236.48
www.google.com.         286     IN      A       74.125.236.51
www.google.com.         286     IN      A       74.125.236.50

;; Query time: 0 msec
;; SERVER: 10.40.4.247#53(10.40.4.247)
;; WHEN: Wed Dec 17 16:04:04 2014
;; MSG SIZE  rcvd: 112

Ping - A Detailed View


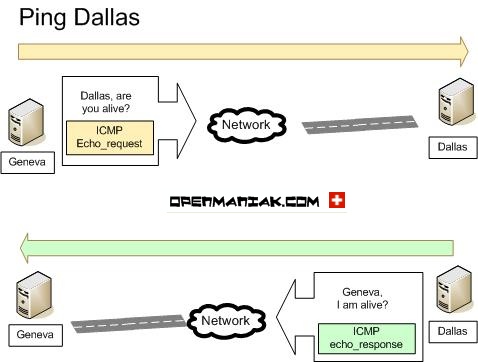
ping picturePing sends very small packets to an IP host who will answer by sending packets back.
The ICMP packets sent to the host are called echo_request and the packets sent back echo_response. 


The ICMP header is composed of a:

- Type
- Code
- Header checksum
- ID
- Sequence 

ping icmp header

Below, you can find some ICMP types.

Type Description
0Echo reply
3Destination unreachable
4Source quench
5Redirect
8Echo request
9Router advertisement
10Router solicitation
11Time exceeded
12Parameter problem
13Timestamp request
14Timestamp reply
15Information request
16Information reply
17Address mask request
18Address mask reply
30Traceroute
Below, you can find the ICMP packet structure.


icmp paceket structure overview

The TTL or Time-To-Live gives you an indication of the number of routers between the source and destination. 


The TTL is used to prevent an IP packet from looping inside an IP network and causing a network meltdown. 

The initial TTL packet value for an IP packet is 255 and then it is decremented by 1 each time it encounters a router. When this value reaches 0, the packet is discarded by a router. The TTL value is contained in each IP packet including ICMP packets. The TTL value given by the ping command is in fact the TTL value of an echo_response packet. 
By default, Windows will decrease the TTL by 128 and Ubuntu Linux by 192.

Let us study three scenarios where A pings B. B is a router (first case), a Microsoft Windows machine (case 2) and a Ubuntu Linux machine (case 3). 
The TTL value is initially 255 and then decreased as described as above. 

Case 1:
When A pings B, it receives a TTL of 251 because the packets crossed 4 routers (-4).
TTL=255-4=251

openmaniak scenario ttl time-to-live router

ping B 

Pinging B [1.1.1.1] with 32 bytes of data:

Reply from 1.1.1.1: bytes=32 time=18 ms TTL=251
Reply from 1.1.1.1: bytes=32 time=21 ms TTL=251
Reply from 1.1.1.1: bytes=32 time=20 ms TTL=251
Reply from 1.1.1.1: bytes=32 time=33 ms TTL=251

Ping statistics for 1.1.1.1:
      Packets: Sent = 4, Received = 4, Lost = 0 (0% loss),
Approximate round trip times in milli-seconds:
      Minimum = 18ms, Maximum = 33ms, Average = 23ms
Case 2:
When A pings B, it receives a TTL of 124 because the packets crossed 3 routers (-3) and a Windows machine (-128).
TTL=255-3-128=124

openmaniak scenario ttl time-to-live microsoft windows

ping B 

Pinging B [1.1.1.1] with 32 bytes of data:

Reply from 1.1.1.1: bytes=32 time=18 ms TTL=125
Reply from 1.1.1.1: bytes=32 time=21 ms TTL=125
Reply from 1.1.1.1: bytes=32 time=20 ms TTL=125
Reply from 1.1.1.1: bytes=32 time=33 ms TTL=125

Ping statistics for 1.1.1.1:
      Packets: Sent = 4, Received = 4, Lost = 0 (0% loss),
Approximate round trip times in milli-seconds:
      Minimum = 18ms, Maximum = 33ms, Average = 23ms
Case 3:
When A pings B, it receives a TTL of 62 because the packets crossed 3 routers (-3) and an Ubuntu machine (-192).
TTL=255-3-192=60

openmaniak scenario ttl time-to-live ubuntu linux

ping B 

Pinging B [1.1.1.1] with 32 bytes of data:

Reply from 1.1.1.1: bytes=32 time=18 ms TTL=60
Reply from 1.1.1.1: bytes=32 time=21 ms TTL=60
Reply from 1.1.1.1: bytes=32 time=20 ms TTL=60
Reply from 1.1.1.1: bytes=32 time=33 ms TTL=60

Ping statistics for 1.1.1.1:
      Packets: Sent = 4, Received = 4, Lost = 0 (0% loss),
Approximate round trip times in milli-seconds:
      Minimum = 18ms, Maximum = 33ms, Average = 23ms

Monday, November 24, 2014

Check your Linux OS version or Name

Two very simple command for same:

cat /etc/issue
cat /etc/redhat-release

Just see the difference in output:


uname - Print kernel and system information. It's output will look like as below and tells you nothing about what OS is it:


Where,
  • 2.6.32-358 - Linux kernel version number
  • SMP - Kernel that supports multi core and multiple cpus.
The output can be interpreted with the following key:
2 – Kernel Version
6 – Major Revision
32 – Minor Revision
358.e16 – Fix/Revision Detail

cat /proc/version  - This output identifies the kernel version that is currently running. It includes the contents of /proc/sys/kernel/ostype, /proc/sys/kernel/osrelease, and /proc/sys/kernel/version files.


Find Distribution Version

Type the following command:
$ cat /etc/*release